
Carpentry
- Meenatchi Sneha
- Oct 5, 2023
- 7 min read

This has been a part of construction that I had been excitedly waiting for since the outset.
I love carpentry. I love furniture making. I have always had a passion for upcycling furniture and woodworking, and to be able to design a whole set of furniture, cupboards and racks for the house excited me!

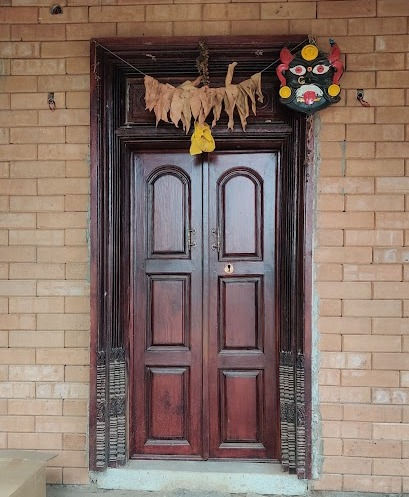
As mentioned in the Aayiram Jannal Veedu blog, a few wood items were purchased from Karaikudi. These were from old houses and needed a bit of rework to look presentable. The main doors, room doors, and Thoons were purchased from Karaikudi and they were adjusted to our requirements in terms of size and polish color. I preferred to have a rosewood/mahogany finish throughout for all the wood items. The color was chosen to contrast the pale brown color that existed throughout the house in the walls and on the roof.
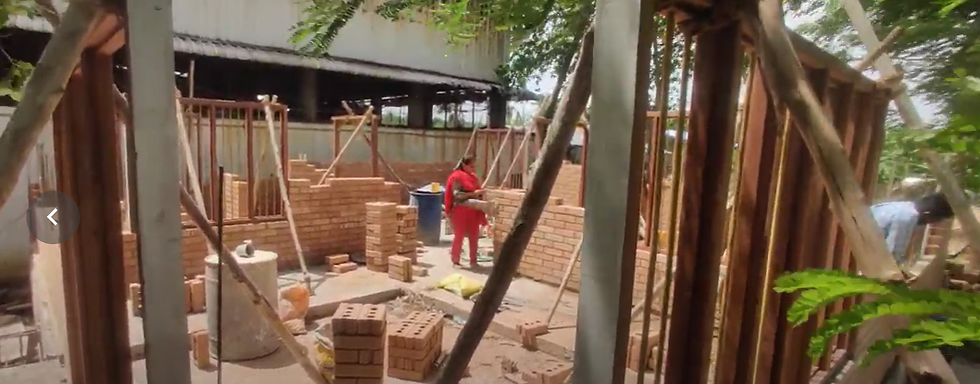
The house according to my plan has a lot of windows - three windows in each room and one in the kitchen, courtyard, and a large French window. This meant a lot of wood requirements.
First, the frames for the windows and French windows were made, and they were fixed during the masonry itself. However, it could be fit after the masonry. Both the techniques came with their own challenges. Fixing them after the masonry work would mean the sides had to be carefully drilled to place the clamps.

In our case, since the span of windows ranged from 6’ to 9’ (which are quite long), we decided to place them while stacking blocks. They were attached to the blocks using clamps, by nailing them with the wooden frames, and by fixing them to the blocks with concrete. For the top of the window and door frames, at the lintel level, U blocks were used, and concrete was poured in it to distribute the load from above the openings. This had to be done with additional support to the lintel level as the thickness of the frames was less than that of the bricks. In cases when the frames aren't ready to be fixed while constructing the walls or if the span is smaller, lintel beams could even be cast in the ground and can be set on top of the opening once cured for about 28 days. However, this ought to be planned previously, and this wouldn't work out if a continuous lintel is planned to run throughout the length of the wall.
Precast lintels are generally made slightly different from how we made them on-site while constructing the walls. If the lintel or sil concretes are to be precast, a flat surface can be chosen and greased and a single layer of U blocks can be placed. With reinforcement put in the slot in the U block, concrete would be poured in. It can be done such that the reinforcement is towards the bottom of the concrete as the bottom part of the beam would be under tension and the top part could cater to compression.
However here, due to the long span, U blocks were placed one above the other to make a circular slot in between them. This meant thicker concrete and more space for reinforcement.
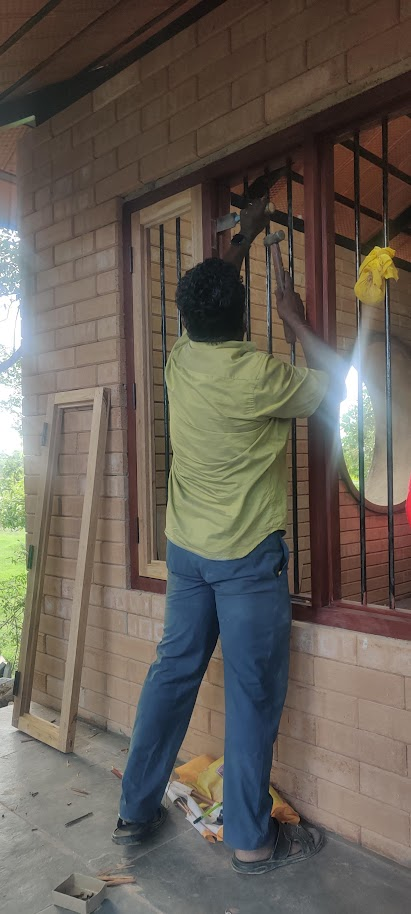
Once the frames were ready, the windows and French windows had to be made. Their outer frames were prepared and later glass was fixed in them.
Windows are given with rods for safety, and they can be done in two ways, one - the outer frame of the window could have the rods attached to it - like in the windows in this house. Second - the rods could be attached to the door of the window like in the French window in our house. These rods would be on one side with glass for the door on the other.

Since the window frames were all made before the construction began there were a few complications while stacking blocks. The height of blocks was considered 3.5” while calculating the height of window frames. However, there were minor errors and a few mm difference in each block added up to leave a gap of about an inch on top of the window frame. This was packed with cement and sand mortar, but for these to be finished and to be presentable, they had to be covered up using wooden strips called Beading wood. They are generally given as small projecting in regular woodworks, and it was here used as a cover-up.
One important care for the wood is Protection against Termites. This would be a mandate for any type of building, especially those built in areas having red soil. Our project was located in clayey soil where termite troubles were less frequent. However, since the Compressed Stabilized Earth Blocks (CSEB) are made of soil, including red soil, this could pave the way for the entry of termites. Therefore, it's best to have the wooden doors or the frames treated (it can be done by injecting repellent liquids into the wood pieces).
For the rest of the wooden pieces at home, plywood was finalized - including the sliding door for the bathroom (why sliding door for the bathroom? - the space in the room was too little, and the bathroom was positioned just behind the room door - Sliding doors are space-saving).
Sliding doors could be fixed in two ways - one with the roller on top and the other with the roller on the ground. Here we decided to go with a roller on top as the tile work was complete by the time the doors were made. The rollers, hinges, and other hardware are all usually available in hardware stores, and based on the availability of material, the type of opening could be planned. It would also be necessary to plan the closure (soft or not) based on the door's weight and having safety in mind.
These are a few learnings about fixing the doors and windows.
Direction of the door opening. Open towards the room or away from the room. The frames should be fixed in place keeping this in mind. It's always safer to open doors and windows towards the room (inwards), this prevents easy access for those outside. However, since the rooms in this building had less space, it was decided to open them all outwards.
How to hold the window or door in an open position - there are various methods including simple hooks that were preferred in this house to give it a traditional feel.
Latches/Tower bolts/hooks are to be placed at multiple ends (at least one on top and one at the bottom) in a window or door if the height is large. This is to prevent the bending of wood over time.
Handles and keyholes are to be fixed on the inside and outside of the doors.
Plywood can be waterproof or regular, and they are available in various qualities. For the cupboards in the kitchen (beneath the slab), we decided to use waterproof plywood, whereas for the wardrobe, cupboard on top we had planned commercial plywood to cut down cost. They would also not be exposed to water, and using commercial plywood should be okay. Plywoods are generally priced per sqft, and a difference of even Rs 10 per sqft could make a whole lot of difference when purchasing for all the needs.
I wanted a uniform finish for all the woodwork - a rosewood finish like the main door and the thoon. In plywood, if just the regular painting was done, it would give a matte finish and for the color I prefer it might look too boring and dull. Hence we decided to add the wood pattern to it. These are again done by painters (experienced ones) using a type of powder and drawing grains and patterns first before painting them. This would be an additional cost but would give the plywood a finish like wood. Why not directly use wood? It's going to cost way more.
The other option in regular buildings could be adding a mica on top of the plywood pieces, this saves the work for the painter and adds on the work for the carpenter. They would almost cost the same; however, it totally depends on us to choose what finish we would want. An added advantage of using mica over plywood is the extra protection against water that it gives.
A few other learnings are here:
Closed cupboards in the kitchen and bathroom cupboards could have an air vent to allow flow of air.
Best to design wood items a little above the floor surface to prevent constant contact with water.
The overhanging on the roofs in this case and sunshades in buildings over windows not only prevent water from entering the house during rains but also protect the wood from exposure to water. This was crucial in Muttram as Muttram has a courtyard window and multiple French windows. They would be covered from the outside; however, on the inside, the wood would be exposed to water. It is therefore planned to cover a part (in L Shape, along the walls with the openings) of the Muttram with glass (allowing only light entry).
The furniture in the house was also decided to be made with wood and another alternative would be rubber wood. The models were all chosen to be minimalist to save space in the house.

There's one major work pending in woodwork and that is the window for the circular opening. It was planned exactly as in the mood board and since wood cannot be made in circular shape, like in AutoCAD the circle is made from smaller straight lines. The craftsmanship would be to make it all look smooth and cute and can't wait for them to get it ready.
With those points delivered it is important to make a note on the economic aspect of using wood. It definitely costs way more than the present-day alternative UPVC. The older the wood, the more is the expense. Also the type of wood and how it can be used. For example, rubberwood is a good alternative to wood, they are made like plywood boards. But they cannot be used on long spans and for heavy objects as they tend to bend. Plywood again has been a good replacement in case of cupboards and flat requirements but they are not as waterproof as using regular wood.
This pretty much sums up what I saw and learned on-site about wood and carpentry as of now. The work is nearing completion and I am waiting to have a complete video of the house filmed.
Thanks for tagging along, cheers to a happy week!


Comments